A little while ago I found my self needing to be able to parse screen resolutions when generating some images in a golang program. I created a library to do this and had a bit of fun optimising it. The result is open source on github. It is a very simple library with a single function but I thought it might be interesting to walk you through the process.
What we need to build is a function that takes a string like “1080p”, “800x600”, or “4K” and returns a width and height value. There should also be an error in the return type just in case we can’t parse the string.
This is going to be a very basic walkthrough of what I did so if you know a bit of go you probably can skip this one. Or skip to the sections on benchmarking and optimization.
Assumptions
You have a working golang 1.11+ installation on your machine.
Setting up the project
Open a terminal and browse to where you want to put the project. It does not have to be in your GOPATH any more. Create a directory and move into it.
mkdir resparse
cd resparse
Set up the module with the go mod tool. It may complain you need to set a GOPATH if you don’t already have it set. As we are not inside our GOPATH we need to tell the module tool what the package path of our project is.
go mod init github.com/wselwood/resparse
Building the code
Now open up your favourte editor. (I use VS code with the excellent go plugin) and create a new file called resolution.go and create a function place holder for our parsing function.
package resparse

func ParseResolution(in string) (int, int, error) {

    return 0, 0, nil
}
This function takes in the string and returns x, y, and error values that match up to the input string. Now that we have created this place holder we can create a test harness so that we know if the code we are writing is working. Create a new file called resolution_test.go. We will use a table driven test for this as it will make it easier for us to add new cases as we think of them.
package resparse

import (
	"testing"
)

type testCase struct {
	input string
	x     int
	y     int
	err   string
}

var cases = []testCase{}

func TestBasicParse(t *testing.T) {

	for _, test := range cases {
		t.Run(test.input, func(t *testing.T) {
			x, y, err := ParseResolution(test.input)
			if (err != nil && test.err == "") || (err != nil && err.Error() != test.err) {
				t.Errorf("wrong error from parsing \"%v\" got \"%v\" expected \"%v\"", test.input, err.Error(), test.err)
			} else if x != test.x || y != test.y {
				t.Errorf("got wrong result from parsing \"%v\" got (%v,%v) expected (%v,%v)", test.input, x, y, test.x, test.y)
			}
		})
	}
}
This is a reasonably long block of code so lets go over it. First we define the package, and import the built in testing package. Next we define a testCase struct that holds an input string and the expected output values. The next line defines an empty list of test cases. Finally we get to the test function its self. Inside we loop over the testcases.
The next bit runs each test as a sub test. This is a useful ability of the go test library as it gives the option to run each of the sub tests in parallel which can speed up the test time significantly.
We can add a couple of basic test cases and then get on with the function its self.
	{"", -1, -1, "could not parse \"\" as a resolution"},
	{" SVGA", 800, 600, ""},
	{"WSVGA", 1024, 600, ""},
	{"800x600", 800, 600, ""},
	{"1600|1200", 1600, 1200, ""},
	{"dgsfgd,4000", -1, -1, "could not parse \"dgsfgd,4000\" as a resolution"},
This will give us some where to work. If you run this test now it will print a lot of failures.
wselwood@DESKTOP:/git/resparse$ go test .
--- FAIL: TestBasicParse (0.00s)
    --- FAIL: TestBasicParse/#00 (0.00s)
        resolution_test.go:31: got wrong result from parsing "" got (0,0) expected (-1,-1)
    --- FAIL: TestBasicParse/_SVGA (0.00s)
        resolution_test.go:31: got wrong result from parsing " SVGA" got (0,0) expected (800,600)
    --- FAIL: TestBasicParse/WSVGA (0.00s)
        resolution_test.go:31: got wrong result from parsing "WSVGA" got (0,0) expected (1024,600)
    --- FAIL: TestBasicParse/800x600 (0.00s)
        resolution_test.go:31: got wrong result from parsing "800x600" got (0,0) expected (800,600)
    --- FAIL: TestBasicParse/1600|1200 (0.00s)
        resolution_test.go:31: got wrong result from parsing "1600|1200" got (0,0) expected (1600,1200)
    --- FAIL: TestBasicParse/dgsfgd,4000 (0.00s)
        resolution_test.go:31: got wrong result from parsing "dgsfgd,4000" got (0,0) expected (-1,-1)
FAIL
FAIL    github.com/wselwood/resparse   0.008s
So lets go and start building our parsing function. We can start with the first test and check for empty or blank strings being passed in. We can trim the string and then check if it is empty. Returning an error if needed.
	work := strings.TrimSpace(in)

	if work == "" {
		return -1, -1, fmt.Errorf("could not parse \"\" as a resolution")
	}
Next we can create the look up table needed to handle named resolutions. Converting things like “SVGA” to 800,600,nil. Outside the function create a new struct type to hold the x, y pairs.
type res struct {
	x int
	y int
}

var known = map[string]res{
	"1080P": {1920, 1080},
	"WSVGA": {1024, 600},
	"SVGA":  {800, 600},
}
We can add more entires later, for now lets just keep those entires. Now we can look up our trimmed input string in the known map. We can use the second return value from the map lookup to know if we found a valid response. We will call strings.ToUpper() to make sure all the input values are easier to match against our known values.
	result, ok := known[strings.ToUpper(trimmed)]
	if ok {
		return result.x, result.y, nil
	}
If we don’t get a response from that we should try and split the string and then try and convert to a pair of numbers. Replace the old zero return with the following:
	splitStart := strings.IndexAny(trimmed, "Xx| ,*")
	splitEnd := strings.LastIndexAny(trimmed, "Xx| ,*")

	width := trimmed[:splitStart]
	height := trimmed[splitEnd+1:]

	x, err := strconv.Atoi(width)
	if err != nil {
		return -1, -1, fmt.Errorf("could not parse \"%v\" as a resolution", in)
	}

	y, err := strconv.Atoi(height)
	if err != nil {
		return -1, -1, fmt.Errorf("could not parse \"%v\" as a resolution", in)
	}

	return x, y, nil
Now if we run the test cases we should get a clear run. At this point we could call it done. But I’m not going to, first we are going to create a benchmark and then we are going to see if we can tune this function a bit.
Benchmarking
Before we can start doing any optimization we need to see how long this function is taking. Thankfully go has a reasonable benchmarking tool built into the testing library. If we hop back to our test file we can add a benchmark that uses the same test data as inputs.
func BenchmarkParseResolution(b *testing.B) {
	for n := 0; n < b.N; n++ {
		ParseResolution(cases[rand.Intn(len(cases))].input)
	}
}
The difference from a test is the use of the B object in testing and the function having to start with Benchmark. The B object has a value N which is the number of times to run the test. So we put that in a for loop for that many times. Then in each loop we pick a random entry from the cases list and run the ParseResolution function.
Go will then take care of the rest for us. If we run this we should see something like the following:
Running tool: C:\\Go\\bin\\go.exe test -benchmem -run=^$ github.com/wselwood/resparse2 -bench ^BenchmarkParseResolution$

goos: windows
goarch: amd64
pkg: github.com/wselwood/resparse2
BenchmarkParseResolution-4   	10000000	       174 ns/op	      39 B/op	       1 allocs/op
PASS
ok  	github.com/wselwood/resparse2	2.068s
Success: Benchmarks passed.
This tells us it ran with an b.N value of ten million and it took on average 174 NanoSeconds for each loop, which allocated 39 Bytes in one allocation. This is pretty good and for something like a command line tool where this is only called once at start up it is well within reasonable bounds. But lets not be reasonable, lets see what we can do here.
First thing to do is see what it is actually doing for those 174 Nanoseconds. So we are going to run the benchmark with the cpu profile enabled. I use the shell built into vs code for this. There is something about the Windows Subsystem for Linux (WSL) that does not play nice with the profile tools in go. It will run but you will have a completely blank profile file at the end.
PS C:\git\resparse2> go test "-cpuprofile=profile.pprof" -bench .
goos: windows
goarch: amd64
pkg: github.com/wselwood/resparse2
BenchmarkParseResolution-4      10000000               177 ns/op
PASS
ok      github.com/wselwood/resparse2   2.136s
You should now find a profile.pprof file in the directory. To open this up we can use the go tool pprof command. This can be accessed from the command line but it has an excellent web ui that provides some great visualizations. To enable the web ui you need to tell it an http port to open up. If you have used the built in http tools at all the format of this string should look pretty familiar.
PS C:\\git\\resparse2> go tool pprof -http=:8000 .\\profile.pprof
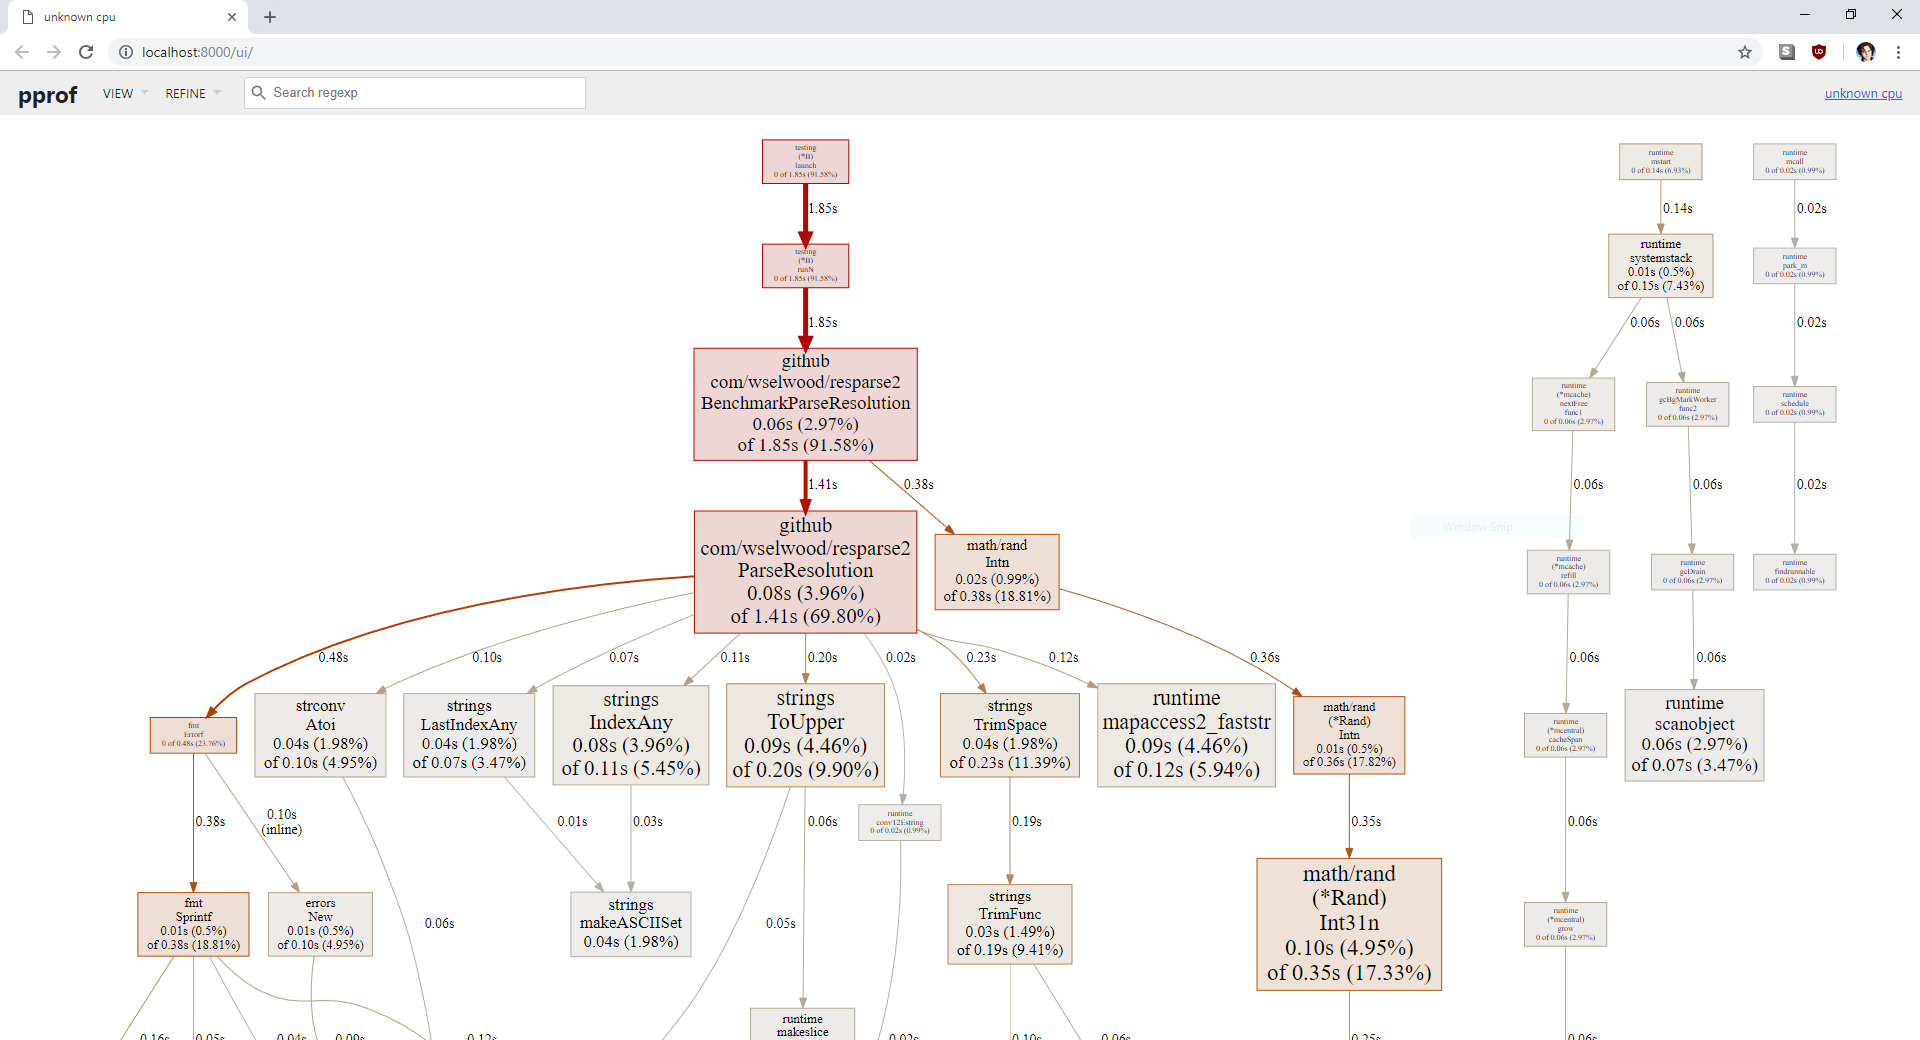
When you run this a web browser window should pop up with something like this:

This is basically a call graph of your benchmark with the calls that took more cpu time with larger and more defined arrows. The two unlinked trees off to one side are the test harness running in the background to keep track of things. Generally each go routine will end up with its own tree. You should be able to see that we spend most of our time creating errors, or in the string functions. Almost no time is spent in the map lookup or the number parsing.
Optimization
Given our ideal input we are going to end up looping over the string at least twice. At best once to do the separator finding at worst twice, and once for the ToUpper call. The call to Trim may or may not require any iteration of the string depending on if there are spaces. In the worst case where it is a completely blank string it will iterate the entire thing.
So we can avoid all of those if we make a single pass over the string and find, the start (after all the white space), the end (last character before all the white space), the start of the separator and the end of the separator. While we are at it we could also check if we need to upper case the string for the map look up. This should be a fairly simple loop with a bit of a state machine.
For a first pass we will just replace the trim and IndexOfAny functions with a single loop. The function becomes something like this:
func ParseResolution(in string) (int, int, error) {

	start := -1
	end := -1
	sepStart := -1
	sepEnd := -1

	for i, c := range in {
		if !unicode.IsSpace(c) {
			if start == -1 {
				start = i
			}
			end = i
		}

		if c == 'X' || c == 'x' || c == ',' || c == ' ' || c == '|' || c == '*' {
			if sepStart == -1 {
				if start != -1 {
					sepStart = i
				}
			} else {
				if sepEnd == -1 || sepEnd == i-1 {
					sepEnd = i
				}
			}
		}
	}

	if start == -1 || end == -1 {
		return -1, -1, fmt.Errorf("could not parse \"%v\" as a resolution", in)
	}

	result, ok := known[strings.ToUpper(in[start:end+1])]
	if ok {
		return result.x, result.y, nil
	}

	// if it is not in our lookup table then try and split the string
	if sepStart == -1 || sepStart == start || sepEnd == end {
		return -1, -1, fmt.Errorf("could not parse \"%v\" as a resolution", in)
	}

	if sepStart != -1 && sepEnd == -1 {
		sepEnd = sepStart
	}

	width := in[start:sepStart]
	height := in[sepEnd+1 : end+1]

	x, err := strconv.Atoi(width)
	if err != nil {
		return -1, -1, fmt.Errorf("could not parse \"%v\" as a resolution", in)
	}

	y, err := strconv.Atoi(height)
	if err != nil {
		return -1, -1, fmt.Errorf("could not parse \"%v\" as a resolution", in)
	}

	return x, y, nil
}
If we run the benchmark now we see:
Running tool: C:\\Go\\bin\\go.exe test -benchmem -run=^$ github.com/wselwood/resparse2 -bench ^BenchmarkParseResolution$

goos: windows
goarch: amd64
pkg: github.com/wselwood/resparse2
BenchmarkParseResolution-4   	10000000	       164 ns/op	      39 B/op	       1 allocs/op
PASS
ok  	github.com/wselwood/resparse2	1.955s
Success: Benchmarks passed.
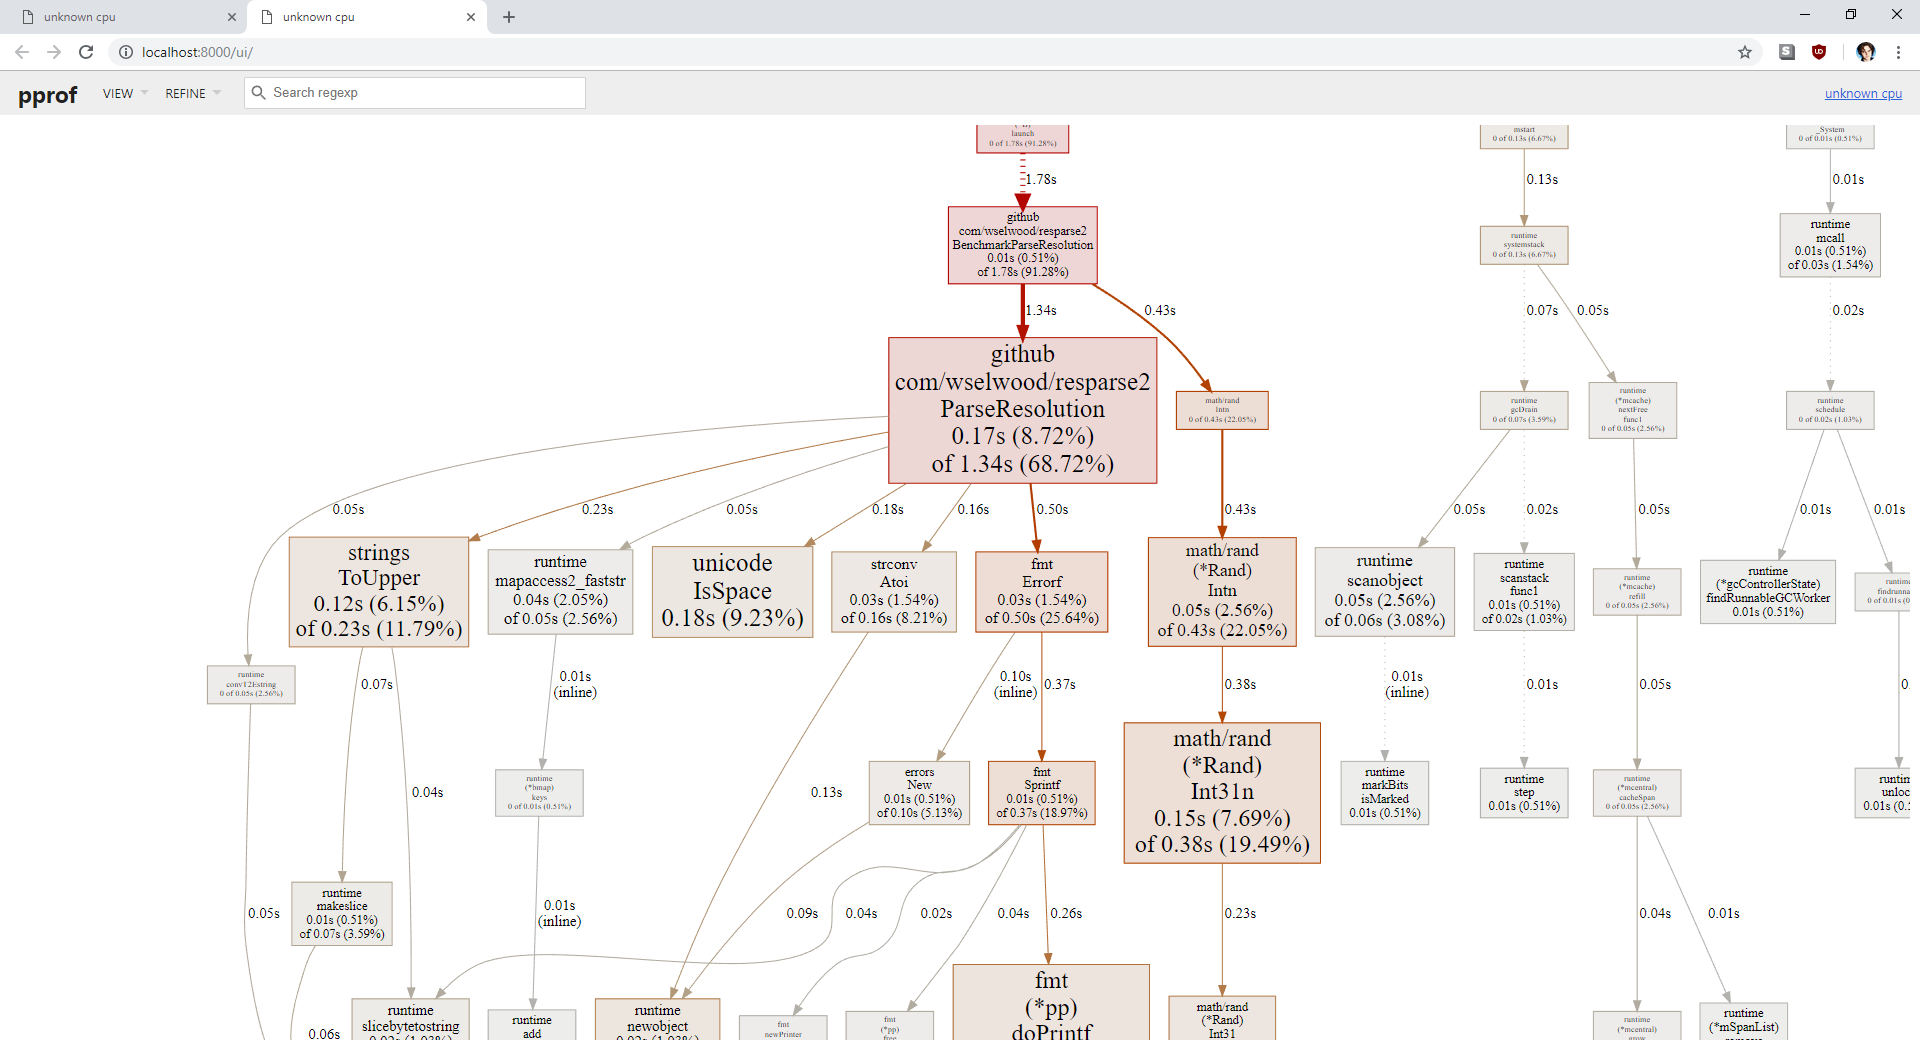
You can see we have shaved 10 nano seconds per op off. We haven’t managed to stop it allocating. It is the ToUpper function that needs that. Now if we look at the graph again:

We can see that the ToUpper call is more defined now and the calls to Trim and IndexOfAny have gone away. Also the random number generation in our benchmark code has got more pronounced. The last change is to make it check in the loop if the character needs to be upper cased later. At this point we are where I stopped so I’m going to use my current code.
This gives a benchmark output:
Running tool: C:\\Go\\bin\\go.exe test -benchmem -run=^$ github.com/wselwood/resparse -bench ^BenchmarkParseResolution$

goos: windows
goarch: amd64
pkg: github.com/wselwood/resparse
BenchmarkParseResolution-4   	10000000	       142 ns/op	      15 B/op	       0 allocs/op
PASS
ok  	github.com/wselwood/resparse	1.744s
Success: Benchmarks passed.
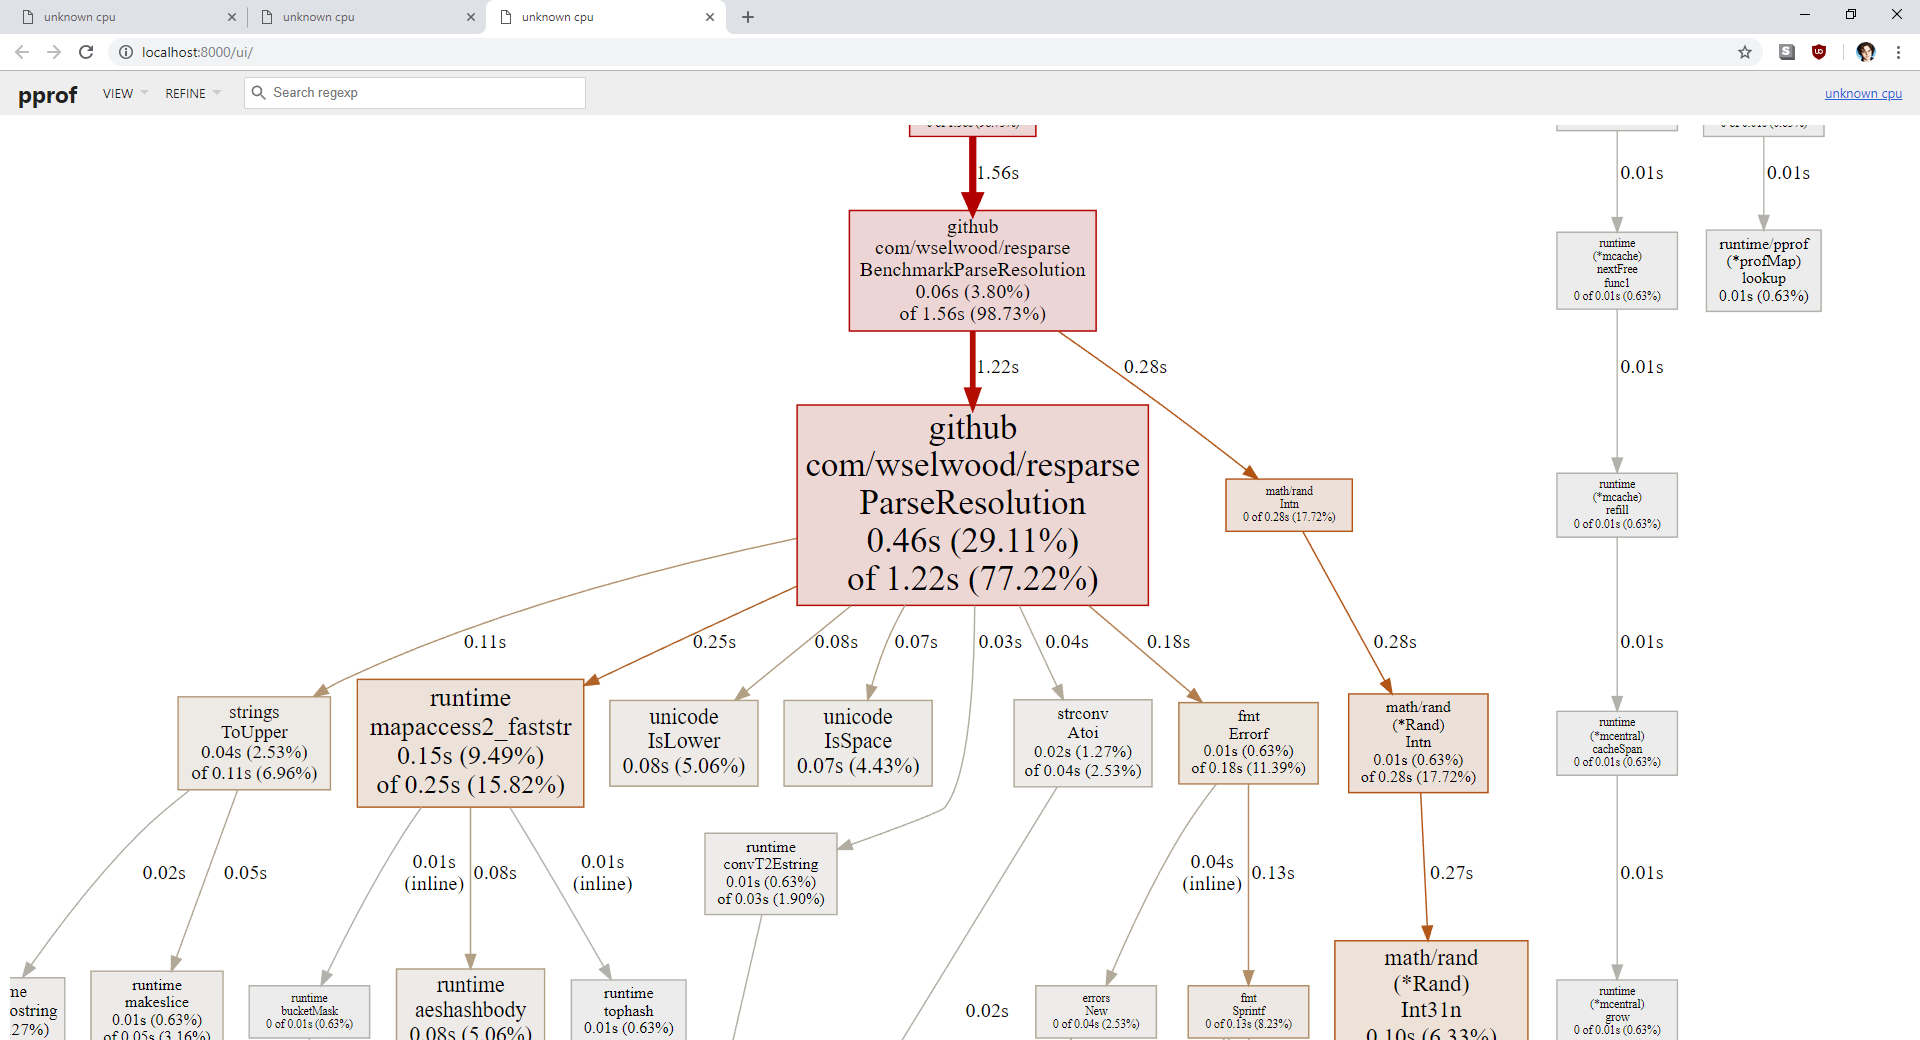
We have shaved another 20 nano seconds off, and managed to half the average allocation size. Note this is averages over the 10 million operations here so going from 1 to 0 average allocations is probably only just under half of them. Now if we look at the profile we can see our map lookup has become a large amount of the time and the ToUpper is now smaller.

Conclusion
While it was probably not really worth going to this level of optimization with this chunk of code, it was interesting and hopefully provided a good introduction to the profile and benchmark tools provided with Go. There is a lot more power in the profile tools that I have not explored here. I recommend Rakyll’s excellent blog for further reading. I hope you gained something from this. If you did, or have any questions, please let me know on twitter.